6 Fun and USEFUL Google Calendar Tips!
If I’ve said it once, I’ve said it 1000 times: my calendar doesn’t just run my life - it SAVES my life. In today’s blog, I’m going to share my SIX TOP TIPS for how I design and use my calendar to make my everyday life easier.
Tip #1: Easily Navigate Two Time Zones
Do you have to manage meetings and appointments across more than one time zone? I live in California, but I have meetings every day with people on the east coast of the U.S., a three-hour time difference.
Creating the meeting invite correctly is irritating and confusing.
This is why I was thrilled to learn that I could add a second timezone column in my calendar - and I could LABEL IT!

Here are the steps:
Go to your google calendar
Go to settings
Select Language and Region
Scroll down to Timezone
Select “Display Secondary Timezone”
Select timezones
Enter label if desired
Confirm selections saved

And that’s it! You can now easily confirm the time zones will work for all participants when you create an event in your calendar. 💪 💪 💪
Tip #2: Hot Keys to Start a New Calendar Item
Hotkeys are one of the ways I move faster through my day. When I first learned this trick, I didn’t expect it to save nearly as much time as it has. But, this one tip has been a small, but mighty, game-changer.
Whenever you want to start a new calendar item, simply type “cal.new” in your Chrome browser. This will open a new calendar event, whether you are in your calendar or not!
There are also hotkeys for Google Sheets, Google Docs, and Google Slides. Just enter the following in your Chrome browser:
“Sheet.new” to begin a new google sheet
“Doc.new” to begin a new google doc
“Slide.new” to begin a new google presentation
Easy-peasy!
Tip #3: Color-Code Events
I love color coding. It’s one of my favorite things ever! #dontjudgeme 😂😂😂
Color-coding the events on my calendar allows me to quickly and easily see how my time is distributed across projects, areas of responsibility, and meetings.
Other color coding options that might work for you are:
by person you’re meeting with
personal vs private activities and meetings
kid school projects or committees you’re working on
and more!
You could even color-code based on priority or urgency.
Here’s how to color code an event in google calendar:
Start a new Event by selecting a time period on your calendar or typing cal.new in your Chrome browser
Enter all the regular information about the event, including invitees
Select “More Options” at the bottom of the Event window
This will expand the Event window
Select the colored circle next to the name of the calendar
Save!
That’s it! You now have a color-coded event on your calendar allowing you to see how your day, week, or even month, is distributed across the various areas of responsibility in your life!
Tip #4: Use the “Schedule” View
I’ll admit, I found this feature by accident, but using it has helped me to be better prepared for my week.
In google calendar, there are several views you may use to “see” your week. You can select the five-day view, seven-day view, or even one-day view.
But, you can also select the “Schedule” view. I use this view for a very specific purpose: I have my schedule emailed to me each evening so I can see exactly what’s coming up the following day!
This helps me to never get surprised by a meeting. But, because I manage my budget right in my calendar, I was also reminded about what bills or other charges might be hitting my accounts this week. See the next tip for more information!
Here’s how to send yourself a schedule each evening:
Open your Google calendar
Go to Settings
Scroll down to “Settings for my calendars”
Select the calendar you want an email from
Go to Other Notifications
In the “Daily Agenda” field, select Email
Tip #5: Color-code Your Calendars
Since I confessed I color code my events, it shouldn’t be too much of a surprise that I color code my calendars, too. This little tip is super helpful to quickly see events outside your regular daily calendar events.
For example, let’s say you have two kids, Johnny and Jenny. Johnny plays basketball and Jenny takes violin lessons.
You can set up a calendar for each kid’s activity so you can easily toggle them on or off as needed. Greatly decreasing the clutter on your calendar and allowing you to see what you need to see when you need to see it!
For a little added spice, add an emoji when you set up the calendar. Just for fun. ;-)
Here’s how to create a new calendar:
Open your Google calendar
Scroll down the left side until you see “Other Calendars”
Select the PLUS sign next to “Other Calendars
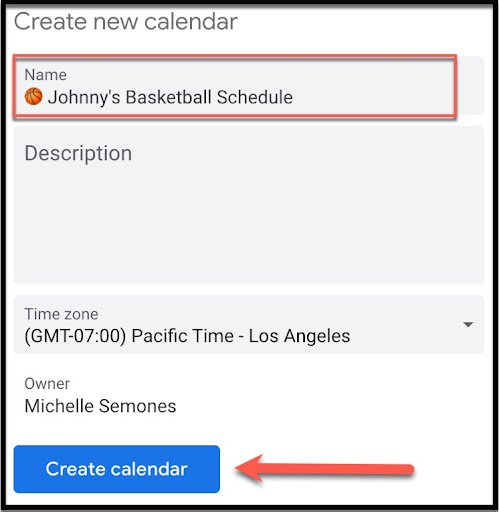
Select “Create new calendar”
Name your new calendar, add an emoji for fun!
Select “Create Calendar”
Find your new calendar under “My Calendars”
Hover your mouse over the name of your new calendar
Select the three dots next to your new calendar
Select a color!
I create calendars for classes I’m taking, classes I’m teaching, and my volunteer work.
As I mentioned above, I’ve even created a calendar for my bills so I can manage my budget right in my calendar. Having the information at my fingertips when I need it, AND being able to toggle it off when I don’t, has been another game-changer!
If you would like to know more about how to create a calendar for your bills, please check out my Skillshare class “How to Build Your Budget Right in Your Calendar!”
You can use this link for a free 30 days of Skillshare. You can watch my class, along with hundreds of others, and if it’s not your thing you can always cancel!
Here’s the link: Get Michelle’s How to Build Your Budget Right in Your Calendar Skillshare class!

Tip #6 Easily Filter and File RSVP Acceptances
My biggest pet peeve when it comes to calendars is RSVP clutter!
Fine, send me a notification when someone declines my invitation. But, I don’t need to know when someone accepts the invitation. That’s simply useless information because there’s nothing for me to do with that except archive it. .
Getting multiple acceptances is especially irritating when I’m putting together a big meeting with a lot of attendees! Suddenly, my inbox is overflowing with acceptances!
Which, hey, I love knowing people want to come to my meeting or event. But honestly, I really only need to know if they CANNOT attend. I can always check the invitation to see who has accepted.
Filing away acceptances before they ever get to my Inbox has not only reduced my irritation but alleviated some of the cyber-clutter I have to deal with every day!
What you need to do is create a Filter to send those acceptances straight to Archive!
Here’s how to automatically archive RSVP Acceptances:
Go to your Google Gmail
Select Settings (the gear icon)
Select “See All Settings”
Select “Filters and Blocked Addresses”
Select “Create a New Filter” (You may need to scroll down the page a bit to see it)
Select the “Has the words” field. This is where the magic happens.
Enter: filename:invite.ics AND accepted
Select “Create Filter”
Select “Skip the Inbox” and “Mark as Read”
Select “Create Filter”
Send me a DM on Instagram or LinkedIn and tell me how much you love it!
NOTE: This will archive ANY invite Acceptance. If you only want to do this for a specific event then enter “Acceptance: Name of Google Calendar Event”.
I have not created a filter to automatically archive invite rejections because when that happens there is a next action: I need to find a new time! So, invite rejections are useful to me. Invite acceptances: cyber clutter!
Conclusion
That’s it! I really hope you find one of these Google calendar tips useful in your everyday life. Again, feel free to drop me a DM on Instagram or LinkedIn and let me know which one you found helpful. OR, send me one of your favorites!
Talk soon!
~Chelle
XOXO
**I am not a licensed financial advisor. I am a money expert and I offer education, tips, tricks and my opinions around money. You should consult a professional who understands your needs in order to make the best decisions for you! Additionally, some links in this blog may be affiliate links, which means if you click the link and buy the product I may earn a small commission - at NO COST to You! It’s one of the ways I keep the lights on around here so TYIA! 😉